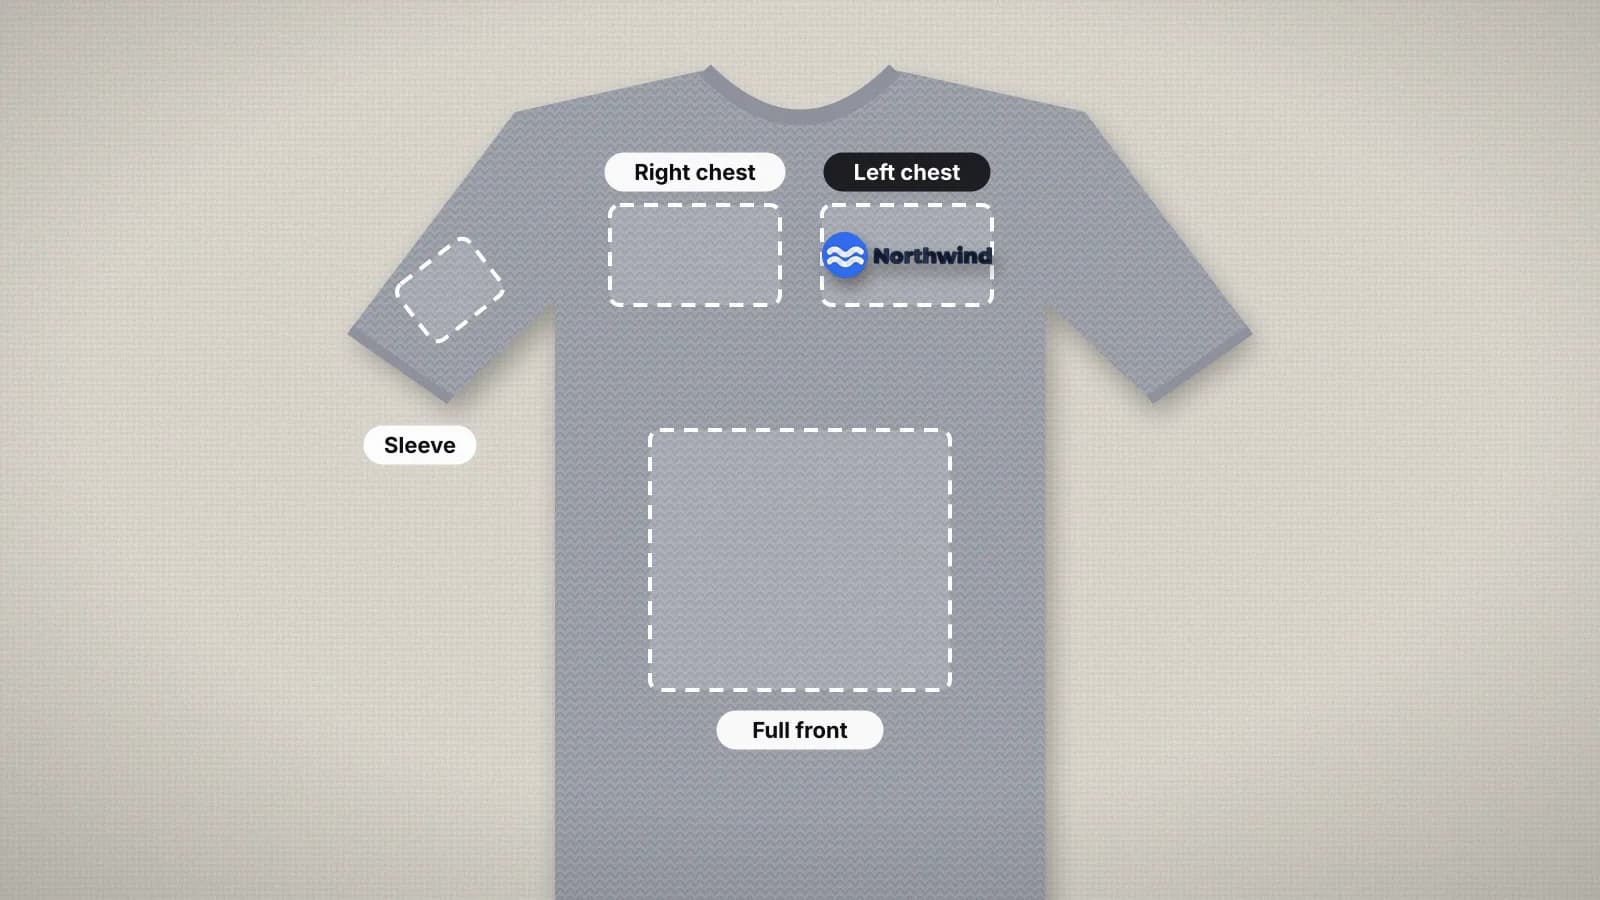
Placement is where a design sits on the item, and it decides the size more than anything else. A left chest logo is about 3.5 in wide, a jacket back about 11 in, a cap front only about 2 in tall. Settle the size and position before you digitize, because a stitch file doesn't scale well by more than about 10%.
The chart below gives standard sizes in inches and millimeters, measured the way most shops do: down from the collar or shoulder seam and across from the center front. They're starting points: adjust for the garment size and for what looks right on the wearer.
Embroidery placement and size chart
| Placement | Design size (in) | Design size (mm) | Where it usually sits |
|---|---|---|---|
| Left chest | 3–4 wide, up to about 3 tall | 75–100 wide, up to about 75 tall | About 7–9 in below the shoulder seam at the collar; about 3.5–5 in from the center front |
| Right chest | 2–3.5 wide | 50–90 wide | Mirrors the left chest; often a name or a second logo |
| Center chest | 4–8 wide | 100–200 wide | Centered, top about 3–4 in below the collar |
| Full front | 8–12 wide | 200–300 wide | Centered, top about 3–4 in below the collar |
| Back of the neck | 2–4 wide | 50–100 wide | Centered, about 1–2 in below the collar seam |
| Full back or jacket back | 10–12 wide | 250–300 wide | Centered, top about 3–5 in below the collar |
| Upper sleeve | 2.5–3.5 wide | 65–90 wide | Outside of the sleeve, about 2–4 in below the shoulder seam |
| Cap front | 4–5 wide, up to about 2–2.25 tall | 100–125 wide, up to about 50–57 tall | Centered on the front, just above the brim |
| Cap side | About 1–1.5 tall | About 25–40 tall | On the side panel, clear of the seams |
| Cap back | About 1 tall | About 25 tall | Centered above the strap opening |
| Tote bag | 5–10 wide | 125–250 wide | Centered, a little above the middle of the front |
| Bath towel | 2–4 tall | 50–100 tall | Centered on or just above the woven border |
| Hand towel | About 1.5–2 tall | About 40–50 tall | Centered on or just above the woven border |
Sizes are for adult garments. On kids' sizes a left chest logo of about 2.5–3 in (65–75 mm) usually looks better, and on fitted women's shirts many shops place chest logos a little higher and closer to the center.
How to measure and mark placement
Height is measured down from the collar, or where the shoulder seam meets it, and side-to-side position from the center front or center back. Measure with the garment laid flat, not on a hanger.
- Lay the garment flat and smooth, buttoned or zipped the way it will be worn.
- Find the center front by folding the garment in half or following the placket, and mark it with a short line.
- Measure down from the collar or shoulder seam to where the design goes.
- Mark the center of the design with a cross, using chalk, a water-soluble pen or a sticker.
- Hold a printout of the design at actual size against the mark, and look at it on a person if you can. An inch higher or lower makes a big difference to a chest logo.
For repeat jobs, make a placement template: a piece of card cut to the neckline with the logo position marked. Every shirt in the order then gets the logo in the same spot.
Try it with your own design
Sign up free, upload an image and get a stitch preview in under a minute.
Drop your image here
PNG, JPG, WebP or SVG · stays on your device
Chest, front and back placements
Left chest is the most-ordered placement on polos, uniforms and workwear: on the wearer's left, over the heart, most often about 3.5 in (90 mm) wide on adult shirts. The left chest logo file page sizes a logo for it. Right chest usually carries a name, a department or a second logo at the same height.
Center chest and full front designs sit centered, with the top a few inches below the collar. Large fronts add a lot of stitches, and dense fills on a T-shirt make a stiff, heavy patch, so keep big front designs light, with more outline than fill, and use cut-away stabilizer.
Full backs and jacket backs are the largest common placement, about 10–12 in (250–300 mm) wide. They need a large field: on a home machine, an 8×12 in hoop (200 × 300 mm) turned sideways takes a design up to about 11.4 in (290 mm) wide and 7.5 in (190 mm) tall with a small margin. The jacket back embroidery file page sizes a design for it.
Sleeves, caps and other small placements
Sleeves take a small logo, flag or name, about 2.5–3.5 in (65–90 mm) wide, centered on the outside of the sleeve. Keep text short: there's little room, and a long word wraps around the arm. A sleeve is a tube, so hoop only one layer and keep the rest of the shirt out of the needle's path.
Cap fronts are the tightest common placement: up to about 2–2.25 in (50–57 mm) tall and 4–5 in (100–125 mm) wide on a structured cap, less on low-profile and unstructured caps. Wide and short works better than tall. The hat logo embroidery file page fits a logo to a cap front, and the hat embroidery guide covers frames, stabilizer and sewing order.
Totes, towels and home items
- Tote bags: center the design a little above the middle of the front panel, so it isn't lost in the fold when the bag is carried. Most totes take 5–10 in (125–250 mm); measure the flat panel and leave room for the handles and seams.
- Bath towels: a name or monogram 2–4 in (50–100 mm) tall, centered on the woven border or just above it, so it shows when the towel hangs folded. Hand towels take about 1.5–2 in (40–50 mm).
- Pillows and blankets: a centered design of about 6–8 in (150–200 mm) on a pillow, clear of the seams, or a corner monogram about 3–4 in (75–100 mm) tall on a blanket.
Towels and fleece need a water-soluble topping so the stitches don't sink into the pile, and lettering 1–2 mm taller than you'd use on a shirt.
Hooping for each placement
- Use the smallest hoop that fits the design with a margin of 5–10 mm on each side. A smaller hoop holds the fabric tighter. The hoop size calculator tells you which hoops a size fits.
- Line up the marks, not the edges. Match the cross on the garment to the hoop's center marks, and keep the hoop square to the center front, or the design sews crooked.
- Hoop knits flat, not stretched. A stretched T-shirt relaxes after unhooping and the design puckers. Use cut-away stabilizer on knits.
- Float what won't hoop. Thick towels, bags, collars and small items can be floated on adhesive stabilizer or clamped in a magnetic hoop.
- Check the orientation. Sleeve and jacket back designs often sew rotated in the hoop. Turn the design on the machine, or rotate it 90° in the digitizer before you download.