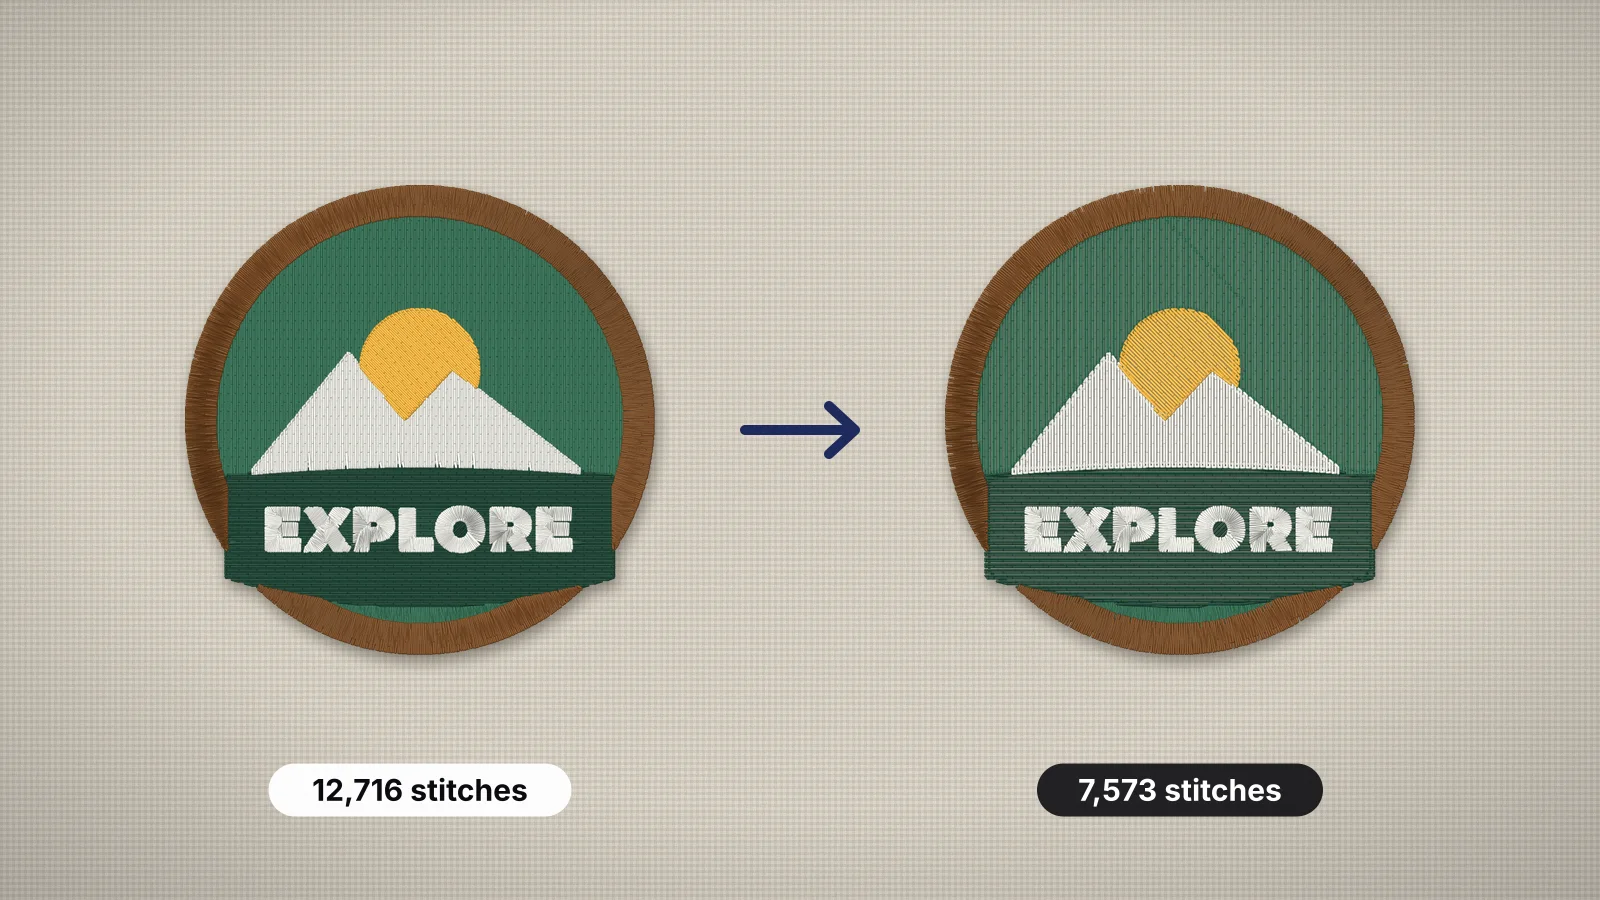
 Free toolLogo stitch estimatorUpload a logo: stitch count, colors, run time and price per piece at left chest, cap or full-front size.Open the tool
Every stitch costs something. At 700 stitches a minute, a 12,000-stitch logo sews for about 17 minutes before color changes and trims, while an 8,000-stitch version takes about 11. Over a run of 100 shirts, that's close to 10 hours of machine time. Fewer stitches also mean a softer design, less puckering and fewer thread breaks.
The goal isn't the lowest possible number. It's the fewest stitches that still cover cleanly and hold their shape on the fabric. This guide lists the levers with typical savings, works through an example, covers what not to cut and shows where each setting is in Embrizo's digitizer.
Why stitch count matters
| Effect | What extra stitches do | Rule of thumb |
|---|---|---|
| Run time | Every piece takes longer on the machine | Stitches ÷ machine speed, plus about 20 seconds per color change and 5 per trim |
| Price per piece | Many shops price per 1,000 stitches, with a minimum | At an example rate of $1 per 1,000, cutting 4,000 stitches saves $4 a piece |
| Thread and needles | More thread and more wear | About 4–5 m of top thread per 1,000 stitches |
| Feel | Dense, layered designs go stiff, like a badge glued on | Soft tees and knits suffer most |
| Puckering | More needle holes pull and push the fabric | Worst on knits and thin wovens |
| Thread breaks | Dense areas shred and break thread | Most likely where layers stack |
The embroidery density guide explains how spacing, coverage and stiffness relate.
The levers, and what each typically saves
| Lever | Change | Typical saving | Watch out for |
|---|---|---|---|
| Size | 10% smaller in width and height | About 19% of all stitches, since the count follows the stitched area | Lettering under 5 mm tall and details under 1 mm |
| Fill density | Spacing from 0.4 to 0.45 mm | About 11% of fill stitches | Fabric peeking through on strong color contrasts |
| Fill density, further | Spacing from 0.4 to 0.5 mm | About 20% of fill stitches | Only for matching thread and fabric, or a textured, open look |
| Underlay | Heavy to standard, or standard to light | Often 5–15% of the total | Knits, fleece and towels need their underlay |
| Stitch type | A large fill shape becomes an outline or run | 80–95% of that shape's stitches | It changes the look from solid to drawn |
| Wide satin | A satin border over about 5 mm becomes a fill | Satin packs about twice the stitches per area, so roughly half | Loses the satin shine on that shape |
| Hidden overlaps | Cut lower layers out under upper ones (knockouts) | 5–30% on layered designs | Leave a slight overlap so gaps don't open |
| Colors and small details | Merge near-identical colors and drop specks | A few percent of stitches, plus fewer trims and color changes | Don't merge colors that carry the design |
| Fill stitch length | Longer stitches along each row, in software that allows it | Up to about 20% of fill stitches | Long stitches snag on garments that see wear |
Two simple rules sit behind the table. Stitch count follows stitched area, so a design scaled from 4 in to 3.5 in wide keeps (3.5 ÷ 4)² = 77% of its stitches, about 23% fewer. And fill stitches scale with spacing: going from 0.4 to 0.45 mm keeps 0.4 ÷ 0.45 = 89% of them. Underlay, satin and running stitches don't all scale the same way, so treat the percentages as estimates. A knockout is the term for cutting one shape out of another so it isn't stitched twice.
Try it with your own design
Sign up free, upload an image and get a stitch preview in under a minute.
Drop your image here
PNG, JPG, SVG, PDF or AI · stays on your device
Not sure what to expect? See real examples or how it works.
A worked example: a patch with 40% fewer stitches
Take a 90 mm (3.5 in) round patch on twill: an emblem in the middle, a filled background and a satin border, digitized at 0.4 mm with heavy underlay and seven colors. The changes below keep its size and its look.
| Step | Change | Stitches after | Saved |
|---|---|---|---|
| Start | Dense version, with the emblem stacked on a full background fill | 16,000 | — |
| 1 | Knock out the background under the emblem | 13,600 | 2,400 |
| 2 | Fill spacing from 0.4 to 0.45 mm | 12,100 | 1,500 |
| 3 | Heavy to standard underlay, which stable twill doesn't miss | 11,100 | 1,000 |
| 4 | Six small filled stars become satin outlines | 10,200 | 900 |
| 5 | Merge two near-identical blues and drop a 1 mm sparkle | 9,600 | 600 |
| Result | Same size, same border, same look at arm's length | 9,600 | 6,400 (40%) |
At 700 stitches a minute, that's about 9 minutes less per patch, plus one fewer color change. The satin border stays at full density because it defines the patch's edge. The figures are rounded estimates for one design; yours will differ, so check the count after each change.
What not to cut
- Density on strong contrasts. White thread on navy or black fabric at 0.5 mm lets the fabric show between rows. Keep 0.4 mm there and save elsewhere.
- Underlay on knits, fleece and towels. Without it, stitches sink into the pile and knits stretch out of shape. Keep heavy underlay, and add a water-soluble topping on towels and fleece.
- Pull compensation. It adds almost no stitches, and removing it opens gaps between colors and narrows satin lettering. The pull compensation guide explains why.
- Lettering size. Shrinking a design to save stitches can push capitals under 5 mm (0.2 in), where they fill in.
- Tie-ins and tie-offs. Lock stitches are a handful of stitches per run, and without them the ends can pull out in the wash.
- Very open fills by accident. Spacing beyond about 0.6 mm reads as a deliberately open texture, not a solid fill.
Change one thing at a time and sew a test after each round. If two changes go in together and the result looks thin, you won't know which one to undo.
How to reduce stitch count in Embrizo's settings
| Lever | Setting in Embrizo's digitizer | What to try |
|---|---|---|
| Size | Width and height in mm or inches, or fit to hoop | 5–10% smaller, as long as lettering stays at least 5 mm tall |
| Density | Fill density and satin density (0.4 mm by default) | 0.45 mm for fills; 0.5 mm only where thread and fabric are close in color |
| Underlay | None, light, standard or heavy | Standard on stable wovens and light on small designs on stable fabric; keep heavy on knits, fleece and towels |
| Stitch type | Fill, satin or outline for each color | Outline for large decorative areas, satin for narrow filled shapes |
| Colors | Number of colors, and merging colors | Merge shades that read as one thread |
| Small details | Smallest detail | Raise it to drop specks and tiny islands |
| Background | Remove background, and switching off shapes the same color as the background | Let the fabric show instead of stitching it |
Embrizo's digitizer already cuts lower shapes out beneath the shapes on top of them, keeping a small overlap so no gaps open, so stacked fills aren't usually the problem in its own files. It also keeps every stitch under 7 mm and none shorter than 0.3 mm, so there's no stitch length setting to push. Check the stitch count and the preview after each change, and save the machine file once you're happy; saving needs a plan.
Checking the count before you sew
- Before digitizing, upload the logo to the logo stitch estimator, which digitizes it at the real size and estimates stitches, colors, trims and sew time.
- When you only have dimensions, use the stitch count calculator to see how size and coverage change the count.
- Compare spacings in the density calculator, which shows stitches per square inch at each setting.
- Watch the sew-out simulation for thin coverage, gaps between colors and long travel runs.
- Test-sew on the same fabric and stabilizer. Hold it up to the light to look for fabric showing through, and stretch knits gently to see whether gaps open.
| Fill spacing | Fill stitches per sq in | Satin stitches per sq in |
|---|---|---|
| 0.4 mm | About 710 | About 1,550 |
| 0.45 mm | About 630 | About 1,380 |
| 0.5 mm | About 570 | About 1,240 |
These are typical figures for designs from Embrizo's digitizer, including underlay and overlap. Multiply by the area that's actually stitched, not the whole box around the design; the guide to estimating stitch count from a logo shows the method.
Practice on a free design
167 ready-to-sew designs in every machine format, free with an account.


Designing for fewer stitches from the start
- Let the fabric work. Negative space, such as letters cut out of a shape rather than a filled box behind them, costs nothing to sew.
- Choose outline styles. Line art and redwork-style outlines use a fraction of the stitches of solid fills.
- Use appliqué for big areas. A fabric piece with a satin edge replaces thousands of fill stitches; see how to digitize appliqué.
- Avoid gradients and photo detail. Shading splits into extra colors and layers.
- Pick the smallest size that reads. A left chest logo is usually 75–100 mm (3–4 in) wide; going bigger rarely helps the design and always adds stitches.


