 Free toolPlacement templatePrint a design at true size with center cross hairs and measurements to place it on a garment.Open the tool
This guide is for owners of single-needle flatbed machines, such as a Brother PE900 or a Janome Memory Craft 500E, who want to put a name or logo on a cap without buying a cap frame. It works well on soft, unstructured caps with small, bold designs, and it has real limits on structured caps.
You'll get which caps flatten, the size limits, how to float a cap step by step, when unpicking the sweatband or back seam is worth it, how to digitize for a flat-hooped cap and when a cap frame or multi-needle machine pays for itself. The hat embroidery guide covers caps in general, including cap frames on commercial machines.
Can you embroider a hat on a single-needle machine without a cap frame?
Yes, if the cap's front can lie flat. Unstructured dad hats, five-panel caps and other soft caps can be floated on sticky stabilizer in a regular hoop and sewn like any flat item. Structured caps, with a stiff buckram lining behind the front, spring back into a dome and usually need a cap frame.
| Cap style | Flat hooping | Why |
|---|---|---|
| Unstructured dad hat | Best | A soft front with no lining; the crown folds flat |
| Five-panel or camp cap | Good | One wide front panel with no center seam |
| Unstructured six-panel | Good, with care | The center seam is a ridge under the presser foot; keep fine detail off it |
| Beanie | Good | Hoop or float the cuff; see how to embroider a beanie |
| Soft-structured or low-profile cap | Sometimes | A light lining may press flat for a short design; test one first |
| Structured six-panel or fitted cap | Rarely | The buckram fights the hoop, so the front lifts and bounces |
| Foam-front trucker | No | The foam crushes flat, and dense stitching weakens it |
The test is simple: press the front panel flat on a table with one hand. If it stays mostly flat between the side seams, it will float. If it springs back into a dome, it needs a cap frame, or a patch stitched flat and sewn or pressed on afterwards.
How big can a design be on a flat-hooped cap?
Keep it about 2 in (50 mm) tall and 3.5–4 in (90–100 mm) wide on most flat-hooped caps, with the bottom at least about 1/2 in (12 mm) above the brim seam. That's smaller than the 2–2.25 in by 4–5 in that fits a structured cap on a cap frame, because the presser foot can't get close to the brim and the front stops lying flat toward the side seams and crown.
| Placement | Design height | Design width |
|---|---|---|
| Unstructured dad hat front | About 1.75–2 in (45–50 mm) | About 3.5–4 in (90–100 mm) |
| Five-panel front | About 2 in (50 mm) | About 4 in (100 mm) |
| Low-profile or soft-structured front | About 1.5–1.75 in (38–45 mm) | About 3–3.5 in (75–90 mm) |
| Side panel | About 1–1.5 in (25–40 mm) | About 2–3 in (50–75 mm) |
| Back, above the strap | About 1 in (25 mm) | About 2–3 in (50–75 mm) |
A 4 × 4 in (100 × 100 mm) hoop fits cap designs up to about 3.75 in (95 mm) wide, and a 5 × 7 in (130 × 180 mm) hoop fits a full 4 in design and leaves more room to clip the sides and brim out of the way. Bold capitals should be at least 6–7 mm tall on a cap. Measure your own cap flat, from side seam to side seam and from the brim to where the crown starts to curve. The cap front size page shows the full area on a structured cap.
Try it with your own design
Sign up free, upload an image and get a stitch preview in under a minute.
Drop your image here
PNG, JPG, SVG, PDF or AI · stays on your device
Not sure what to expect? See real examples or how it works.
How do you float a cap on sticky stabilizer?
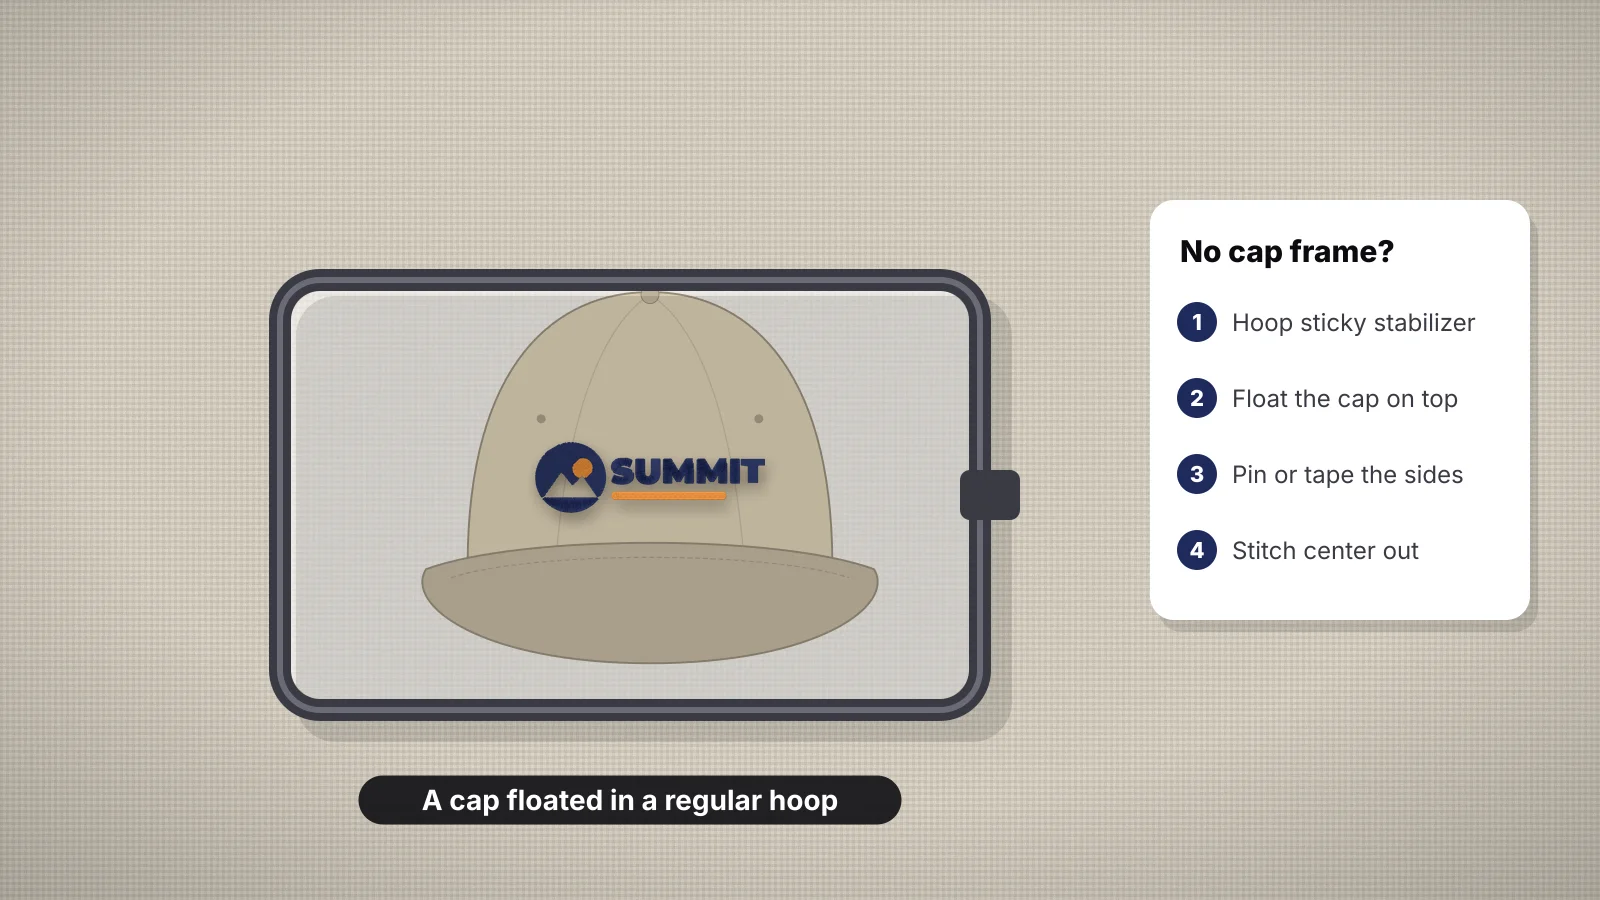
Hoop a sheet of sticky tear-away stabilizer instead of the cap, press the cap's front onto it, and hold the edges with pins or clips so nothing shifts while it sews. That's called floating, and it's the standard way to sew a cap on a flatbed machine.
- Prepare the cap. Take out any cardboard or plastic insert and the tags, and fold the sweatband out so it sits away from the front panel. Mark a vertical center line on the center seam or the middle of the front, and a mark for the bottom of the design about 1/2 in above the brim.
- Hoop the stabilizer. Hoop sticky tear-away paper side up and drum-tight, in the smallest hoop that fits the design. Score the paper inside the hoop with a pin and peel it away. Without sticky stabilizer, hoop a firm tear-away and mist it with temporary spray adhesive, away from the machine.
- Press the cap on. Line up the center line with the hoop's center marks and smooth the front onto the stabilizer from the middle out to the side seams, without stretching it.
- Pin, clip and tape. Pin through the cap and stabilizer just outside the design area, or clip the sides and brim to the hoop edge. Tape the sweatband back so it can't fold under the needle.
- Turn the cap and the design to match. Mount the hoop and move it through its range to check the brim and crown can't hit the machine arm. On many flatbed machines that means the brim faces you or the cap sits sideways, so rotate the design 90 or 180 degrees on the screen or in the file so it sews upright on the cap.
- Baste and trace. If your machine can sew a basting box around the design, do it to tie the cap to the stabilizer. Then trace the design area to check the presser foot clears the brim.
- Sew slowly and watch. Lower the embroidery speed if your machine allows it, keep the crown clear of the needle, and stop if the front lifts or ripples.
- Finish. Remove the basting, tear the stabilizer away close to the stitching, and steam the front gently over a rolled towel.
Some embroiderers hoop the cap front itself in a magnetic hoop, which clamps the front and the backing together without forcing a ring over the cap. It holds better than sticky stabilizer alone, but only on soft caps. The stabilizer guide covers sticky and adhesive backings, and the cap stabilizer page gives the backing for each cap type.
Sew your first one on a spare cap of the same style. One test shows the height, the brim clearance and whether the front stays put.
Should you unpick the sweatband or the back seam?
Only when the cap won't lie flat any other way, and only on a cap you'll keep or give away, not one you sell as new. Opening part of the sweatband or the back seam lets the front lie flatter in a regular hoop, but it takes time and leaves a repair that shows if you look for it.
| Approach | How | Trade-offs |
|---|---|---|
| Float the cap as it is | Fold the sweatband out and float the front on sticky stabilizer | Fastest and leaves the cap untouched; firmer fronts can lift |
| Unpick the front of the sweatband | Unpick the sweatband stitching across the front, sew the design, then stitch the sweatband back | The front lies flatter and the sweatband can't be caught; extra work and a resewn line inside |
| Open the back seam | Unpick the center back seam or the seam above the strap so the cap opens out, then resew it | The front lies flattest; the seam has to be resewn neatly, and taped inside seams are hard to match |
| Stitch a patch instead | Sew the design flat on twill or felt, then sew or press it on | Works on every cap, structured or not; a different look |
| Use a cap frame insert | Clamp the cap in a frame made for your hoop or machine | No unpicking; costs about $90–$150 and fits only the hoops it's made for |
Unpicking works best on cotton dad hats with a simple sewn sweatband. Avoid it on caps with a bonded sweatband or a buckram front, which are hard to put back. Work from the inside with a seam ripper, keep the original needle holes, and resew along them with matching polyester thread so the repair follows the factory line.
How do you digitize a design for a flat-hooped cap?
Digitize it at the final cap size, with bold shapes, fewer layers and a sewing order that starts at the bottom center and works out and up. A floated cap is held only by stabilizer, pins and basting, so a file that pushes the fabric less sews straighter.
- Size it for the cap. Set the width so the height stays under about 2 in, with capitals at least 6–7 mm tall. Don't shrink a left chest file to fit; digitize the artwork again at cap size.
- Bottom up and center out. Starting near the brim and in the middle pushes any movement toward the sides and crown, where it can go, instead of trapping a bubble in the center. For a name, sew from the middle letters out to each end.
- Fewer layers. Every fill stacked on another adds stitches and stiffness and gives the floated front another chance to shift. Cut shapes out of the fill below rather than layering them, and drop outlines that have to line up exactly with a fill.
- Standard density, not heavier. A fill around 0.4 mm with standard underlay suits cap twill. Very dense fills stiffen the front and pucker around the logo.
- Satin borders over hairlines. A 1–1.5 mm satin edge hides a small shift; a single running-stitch outline shows every one.
- Slower speed. Turn the embroidery speed down a step or two for caps. Less bounce means cleaner edges.
Commercial cap files follow the same rules, which is why the hat logo embroidery file page and the custom hat business guide give the same sizes and sewing order for cap frames.
When is a cap frame or multi-needle machine worth it?
When you sew structured caps, or more than a few caps a month. Floating works for gifts and one-offs on soft caps, but a cap frame holds the front firmly and repeats the same placement every time, which matters once customers pay for hats.
| Option | What it does | Typical cost |
|---|---|---|
| Floating on sticky stabilizer | Soft caps on any flatbed machine | About $16–$25 for a roll of sticky stabilizer |
| A cap frame insert for a home hoop | Durkee makes single-needle cap frames for some Brother, Baby Lock and Husqvarna Viking machines, including inserts for their 5 × 7 in hoops; check the exact hoop or model listed | About $90–$150 at retailers |
| Brother PRCF3 cap frame and driver | Fits the Brother PRS100 single-needle machine and Brother's PR multi-needle machines (check your model); sews about 130 × 60 mm on structured caps | About $1,000–$1,200 |
| A multi-needle machine with a cap driver | Turns the cap on a curved frame under the needle; the Ricoma EM-1010 ships with 2 cap rings and a cap driver | About $5,500–$13,000 for home and small-business machines |
A rough rule: float caps for yourself and for gifts, add a cap frame for your machine when you sew structured caps or more than a few a month, and look at a multi-needle machine when you take orders of 12 caps or more, where rethreading every color on a single needle costs more time than the sewing. How much an embroidery machine costs has 2026 prices, and single vs multi-needle machines compares the two.
Practice on a free design
167 ready-to-sew designs in every machine format, free with an account.



How do you make a cap file with Embrizo?
Upload the logo or name to Embrizo's digitizer, set it to cap size and download it in your machine's format, after checking the stitch preview. That way you can fix the size and lettering before you float a cap.
- Set the size and fabric. Upload a PNG, JPG, SVG, PDF or Illustrator file to the digitizer, set the width so the height comes out around 2 in, such as 3.75 in (95 mm) for a wide logo, and choose the woven fabric preset, which suits most cap twill.
- Rotate to match the hoop. Turn the design 90 or 180 degrees if you'll float the cap sideways or with the brim toward you, so you don't have to rotate it on the machine.
- Keep it light. Merge similar colors, or set a color to satin or outline. Larger shapes are cut out of the fill beneath them rather than stacked on it.
- Read the design check. It flags details too fine to sew, very small designs and many colors, so you can enlarge the lettering before the test cap.
- Download your format, such as PES for Brother and Baby Lock or JEF for Janome, and copy it to a USB stick.
What it doesn't do: it orders stitches to keep trims and jumps down, not specifically from the center out for caps, and it doesn't add a basting box, so use your machine's basting setting if it has one. For bold logos and names on floated dad hats that works well; for fine lettering, sew a test cap first. Digitizing and previews are free with an account; downloading files needs a plan.


