 Free toolSew-out simulatorWatch any embroidery file stitch out, color by color, before it touches your machine.Open the tool
Every embroidery design, from a monogram to a jacket back, is built from a handful of stitch types. Knowing them helps you read a design, fix one that sews badly, choose settings in digitizing software and draw artwork that stitches well.
This guide covers each type, what it's used for, and the widths and densities digitizers typically use, then the stitches you don't see: underlay, lock stitches, jumps and trims. The last section shows which stitch Embrizo's digitizer picks for each shape, and how to change it. For a definition of any term, see the embroidery glossary.
What are the main machine embroidery stitch types?
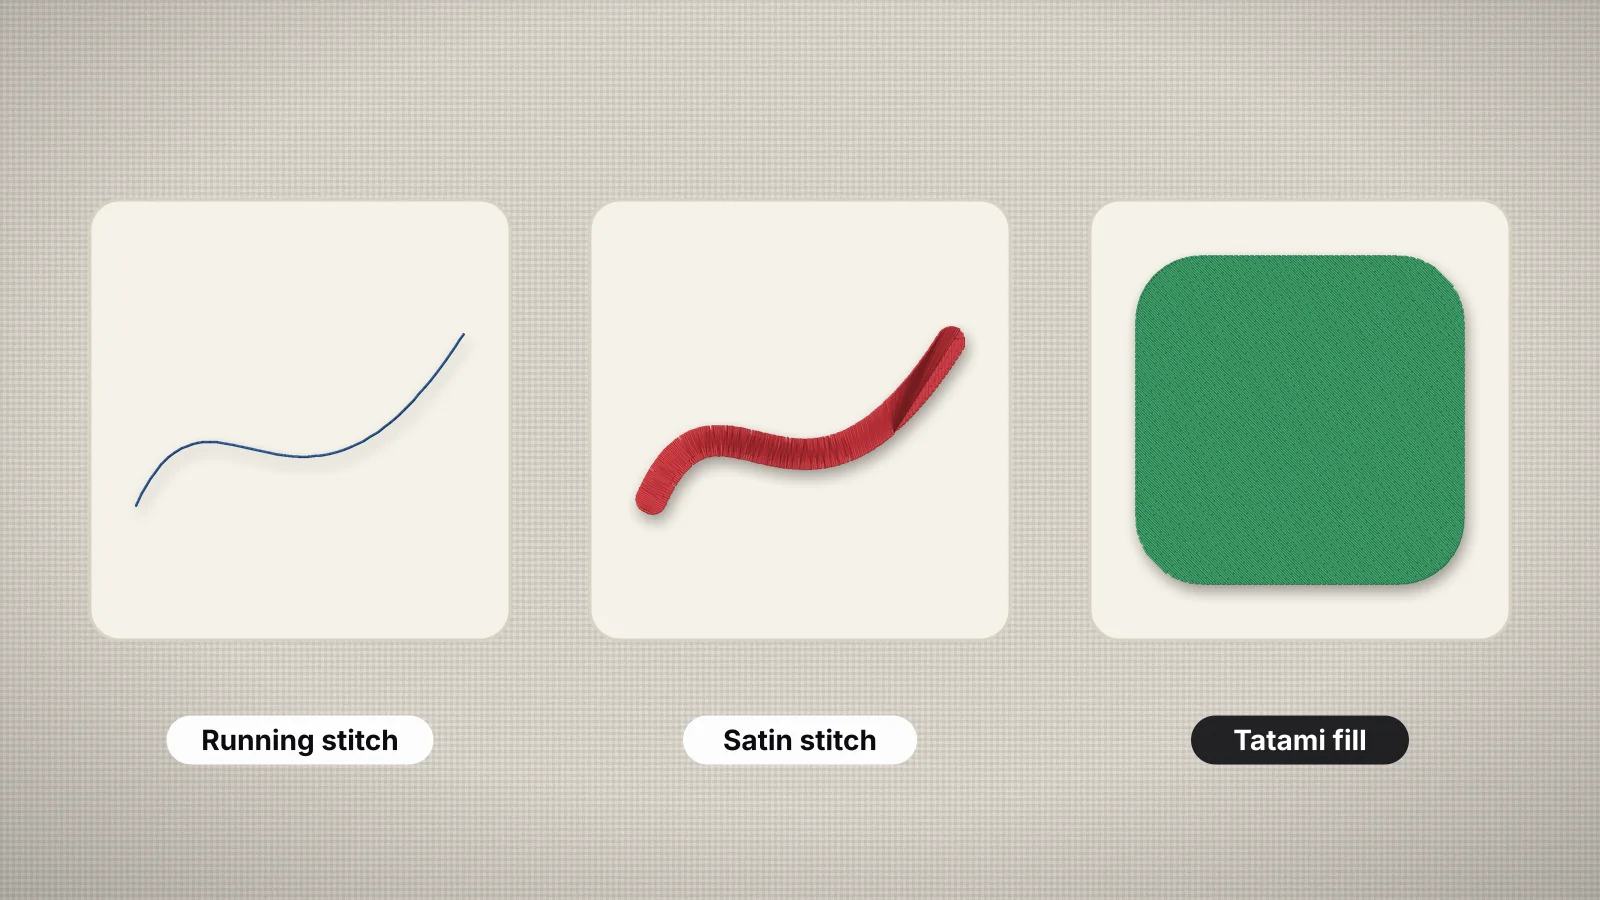
Three stitch types do most of the work: running stitch for lines, satin for narrow shapes and tatami fill for areas. The rest are variations of them or support stitches. Typical values for 40-weight thread:
| Stitch type | Used for | Typical width | Typical density or length |
|---|---|---|---|
| Running stitch (walk) | Fine lines, details, outlines and travel between shapes | One thread wide | Stitches about 2–2.5 mm long; shorter on tight curves |
| Bean stitch (triple run) | Bold outlines, redwork and lines on textured fabric | A bold line, about three threads' worth | Each stitch sewn three times, about 2–3 mm long |
| Satin stitch (column) | Lettering, borders, outlines and narrow shapes | About 1–7 mm | Stitches about 0.35–0.45 mm apart |
| Tatami fill | Backgrounds and any area wider than satin | Anything over about 6.5–7 mm | Rows about 0.4–0.45 mm apart, stitches about 3–4 mm long |
| Contour fill | Petals, leaves and waves, with rows that follow the outline | Any | Spacing similar to tatami |
| Motif fill | Textured backgrounds made of a repeating pattern | Large areas | Usually lighter than tatami, so the fabric shows |
| E-stitch and blanket stitch | Appliqué edges with a hand-sewn look | Prongs about 2–4 mm long | A bite about every 3 mm |
| Appliqué placement line and tack-down | Positioning and holding appliqué fabric | A running line; a tack-down zigzag about 1.5–2.5 mm wide | Open spacing, covered later |
| Underlay | A hidden base under satin and fill | Inside the shape | Open, with a few millimeters between rows |
| Lock stitches | Tying the thread off at the start and end of a run | Tiny | 3–4 stitches under about 1 mm |
| Jumps and trims | Moving to the next area | None | Commands, not visible stitches; a DST jump is at most 12.1 mm |
These are starting points, not rules. Fabric, thread weight and the look you want all shift them, and the density guide explains how spacing changes coverage, stitch count and stiffness.
Running and bean stitch: lines and fine detail
A running stitch is a single line of stitches from point to point, the embroidery version of a pencil line. It's the only stitch that can sew details thinner than about 0.75 mm, and it's also what carries the needle between shapes, hidden under stitching that sews later.
- Length: about 2–2.5 mm on straight lines. Go shorter, around 1–1.5 mm, on tight curves and small lettering so the line follows the shape.
- Bean stitch sews each stitch three times: forward, back and forward. The line is bolder but still flexible, which suits outlines on towels and fleece, redwork and line-art portraits.
- Travel runs are running stitches hidden under areas that sew later, so the machine can move without a trim.
- Where it goes wrong: a single running stitch can sink out of sight on pile fabric, and very long stitches snag. Use bean stitch, a topping or both on towels.
Redwork embroidery is built almost entirely from running and bean stitch, and the photo to line art embroidery tool turns a photo into a triple-run outline.
Try it with your own design
Sign up free, upload an image and get a stitch preview in under a minute.
Drop your image here
PNG, JPG, SVG, PDF or AI · stays on your device
Not sure what to expect? See real examples or how it works.
Satin stitch: lettering, borders and columns
A satin stitch zigzags across a narrow shape from edge to edge, so each stitch spans the whole column. The thread lies flat and parallel, which gives the smooth, shiny, slightly raised look of embroidered lettering and badge borders.
| Column width | What happens | What to do |
|---|---|---|
| Under about 1 mm | Needle holes crowd together and the stitches pile up | Use running or bean stitch, or thicken the shape |
| About 1–7 mm | Clean, shiny columns | Satin; most digitizers space the stitches about 0.4 mm apart |
| Over about 7 mm | Long stitches loosen, snag and wash badly | Split the satin, or switch to a fill |
The stitch angle turns with the shape, so the stitches in a letter S rotate around its curves. Satin pulls the fabric in across the column, so digitizers add pull compensation, typically 0.2–0.4 mm per side, to keep columns the width they were drawn. Satin vs fill stitch covers when to use each in a logo.
Satin width is measured at the stitched size. A border that's 4 mm wide in a 4 in design becomes 8 mm wide when the same stitch file is enlarged to 8 in, which is one reason resizing a stitch file by more than about 10% usually means digitizing it again.
Tatami fill and its patterns
Tatami fill covers an area with rows of running stitches, with the needle points offset from row to row so no lines form across the shape. It's the standard fill for backgrounds, large letters and anything wider than satin.
- Row spacing sets the density: about 0.4 mm for 40-weight thread on most fabrics, about 0.43–0.45 mm on knits and 0.5 mm on leather.
- Stitch length along the row, about 3–4 mm, sets the texture. Shorter stitches follow edges better; longer ones look smoother.
- Fill angle changes how the area catches the light. Two touching areas in the same color look different if their angles differ, and digitizers use that on purpose.
- Fill patterns are the offset sequences of the needle points, such as the steps in a 1/3 or 1/4 pattern. They change the look of the surface, not the coverage.
- Contour fill curves its rows with the shape's outline, like ripples, for petals, leaves and waves.
- Motif fill repeats a small pattern, such as diamonds, waves or stars, usually sewn light so the fabric shows between the lines.
Fills make up most of a design's stitch count, so a big solid background makes a stiff, slow design. The stitch count calculator shows how size and density change the count before you digitize anything.
Motif, E-stitch and appliqué stitches
Specialty stitches handle edges and effects that satin and fill don't. You'll meet them mostly in appliqué and decorative designs.
- E-stitch sews along an edge with short prongs reaching inward, like a row of letter Es. It holds appliqué fabric down with a light, hand-finished look and far fewer stitches than satin.
- Blanket stitch is a similar edge stitch that takes a bite into the appliqué piece about every 3 mm, the classic finish on quilts and baby blankets.
- The appliqué sequence: a running-stitch placement line shows where the fabric goes, a tack-down of open zigzag or running stitch holds it, you trim the fabric close, then a satin, E-stitch or blanket stitch covers the raw edge.
- Motif runs repeat a small shape along a line, such as hearts or scallops, for borders and trims.
- Knockdown stitches are a light, open layer that flattens the pile on towels and fleece before the design sews on top.
The appliqué maker builds the placement line, tack-down and a satin, blanket or raw-edge cover for a shape, letters or a silhouette, and how to digitize appliqué explains each step.
Underlay: the stitches you don't see
Underlay is a light layer sewn first, under the visible stitches, to hold the fabric to the stabilizer and give the top stitches a smooth base. It's covered completely, so you only notice it when it's missing: fabric showing through, sinking stitches or wavy edges.
| Underlay type | Goes under | What it does |
|---|---|---|
| Center run | Narrow satin, such as small lettering | Anchors the column without bulk |
| Edge run | Medium satin and the edges of fills | Holds the outline for crisp edges |
| Zigzag | Wide satin, often over edge runs | Lifts the column and covers the fabric |
| Tatami underlay | Large fills | A light fill at an angle to the top rows, so they don't sink |
Knits, stretch fabrics, fleece and towels need more underlay; leather needs less, because every needle hole is permanent. What is underlay in embroidery covers each type and how much each fabric needs.
Lock stitches, jumps and trims
These are the stitches and commands between the visible parts of a design. They decide whether it holds up in the wash and how clean the front and back look.
- Lock stitches, or tie-ins and tie-offs, are three or four tiny stitches back and forth at the start and end of each run, so the thread can't pull out after a trim.
- Jumps move the hoop to a new spot without sewing. Formats limit each move, such as 12.1 mm in DST, so a long move is written as several jumps.
- Trims tell the machine to cut the threads before a jump. Each one takes a few seconds and needs lock stitches on both sides, so a good sewing order keeps them few.
- Color changes are stops or needle changes. On a single-needle machine each one means rethreading by hand.
- Very short and very long stitches: stitches under about 0.3 mm can break thread or cause bird nests, and very long ones snag, so good files remove or split them.
The embroidery file checker scores any stitch file for long satins, very long and tiny stitches, density, trims and repeated colors before you sew it.
Practice on a free design
167 ready-to-sew designs in every machine format, free with an account.

Which stitch types Embrizo picks automatically
Embrizo's digitizer measures every shape in your artwork at the size you set and chooses the stitch from its width. You see the result in the stitch preview and can change it per color.
| Shape at the stitched size | Stitch Embrizo uses | Default settings |
|---|---|---|
| Lines thinner than about 0.4 mm | Single running stitch | 2 mm stitches |
| Lines about 0.4–0.75 mm wide | Bean stitch | 2 mm stitches, each sewn three times |
| Shapes about 0.75–6.5 mm wide | Satin column that follows the shape's centerline | 0.4 mm spacing; stitches longer than 7 mm are split |
| Anything wider than 6.5 mm | Tatami fill, with the angle chosen per shape | Rows 0.4 mm apart, stitches about 3.5 mm long |
It adds underlay at one of four levels (none, light, standard or heavy), 0.2 mm of pull compensation per side, 0.3 mm of overlap where colors meet, lock stitches on every run, and trims where a travel run would show. The fabric presets for woven, knit, stretch, fleece and leather adjust the density, compensation and underlay.
- To override it, set any color to auto, fill, satin or outline in the color list. Outline sews a bean-stitch line along the shape's edges.
- What it doesn't make: motif or contour fills, E-stitch, knockdown layers or 3D puff. Those are set up by hand in desktop software. For appliqué edges, the appliqué maker adds a blanket stitch.
- Small text: narrow shapes of one color, such as small lettering, all get the same stitch, so a word never mixes satin letters with running-stitch ones.
Digitizing and the stitch preview are free with an account, so you can try a design on different fabric presets and stitch types before you download it with a plan.


